
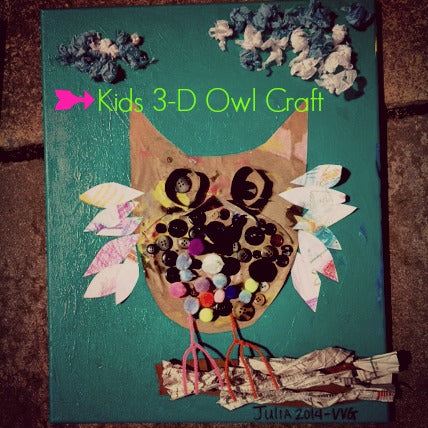
Last week, we hosted daily Kids Spring Break Camps at the studio from 9am-noon. They were an absolute hit: we crafted, read books, ate snacks, played outside, practiced a little yoga, sang, and played creative games. One of the projects was a 3-D Owl and the craft turned out so cute, I just had to share it with you.
Materials:
Canvas
Canvas
Paint (any color, for background)
Tissue Paper
Glue Gun
Glue Stick
Newspaper
Buttons
Pompoms
Pipe Cleaners
Grocery Bag
Scissors
White Printer Paper
Crayons
Toilet paper rolls (Cut into 1 inch deep rings)
Elmers Glue
How To:
1. Have kids paint the canvas with any color paint (I let them choose the color they like the best)
2. While the canvas dries, have kids color the white printer paper
3. Adults: Cut out the owl shape and then take kids colored paper and cut out feathers for wings
4. Have kids arrange buttons and pom poms on owl body
5. Adults: Hot glue the buttons and pom poms on lower portion on owl body. Glue toilet paper rolls for eyes and let child pick out their two favorite buttons to be 'eyes'.
~Take 2 pipe cleaners, and cut in half. Bend two of the halts in to a U shape and then take the other two halts through each center. Bend the pipe cleaner around the U to make a foot.
~Cut two long triangles with paper. Bend in center. Hot glue to make beak with edges touching.
6. Adults: Squirt glue in upper portion of canvas for 'clouds' Give kids tissue papers of various light colors to roll into tiny balls. Have them place on the glue to make clouds.
7. Adults: Squirt glue on the outside of the owl body for kids to glue down 'wings'
8. Have kids twist strips of newspaper to make a 'branch'. Adults, hot glue down.
Taadaaaa… you will have a funky, fun, 3-D Owl
(This whole project takes about an hour and some change)
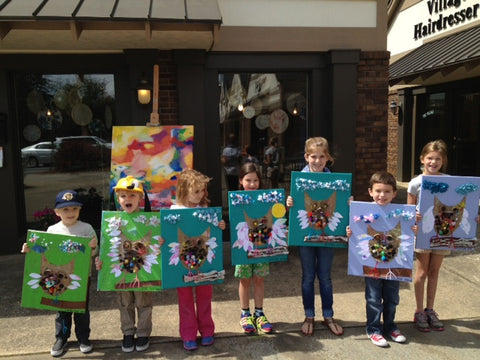
Lookin good, crew!
